
2025-09-01 @
Angular PWA tutorial part 6 - Let’s talk caching
Changelog:
2025-09-07: Added link to part 7.
First, we’ve created and installed our PWA app. Then, we’ve notified our users about a new version being available. Later, we implemented the backend and the frontend for the web push notification feature. In the last post of this series, we’ve looked at controlling the appearance and installability of our application.
Today, we discuss caching strategies and the role of the ngsw-config.json file.
As always, the complete source code will be available here.
The key feature that makes PWAs possible
So far, we’ve only mentioned the existence of a service worker, but we’ve mostly ignored it. Let’s talk about it now.
The service worker is standard browser feature, so it is not specific to Angular. At the end of the day, it is a simple JavaScript script. What makes it special is that it runs on a separate thread from the browser UI, which allows it to perform tasks in the background, without blocking the UI.
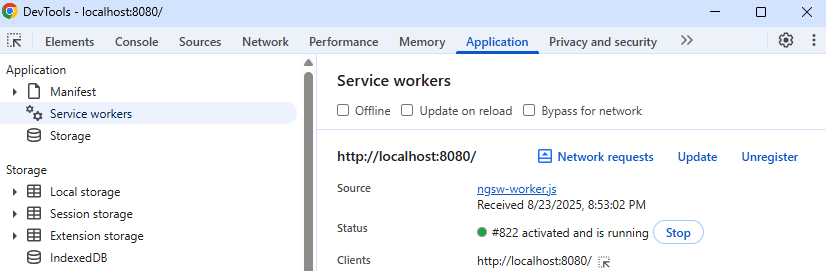
When a service worker is installed, it sits between the web app and the network, taking on the role of a proxy. It can intercept and modify HTTP requests, and it can serve responses from its cache. Yes, this means the service worker can cache our entire application and make it available to our users, even when they are offline.
Service workers are also what listen for push notifications in the background and display them even if the app is not opened in any browser tab. Whether the notification can be displayed even if the browser is not opened at all depends on the operating system and your browser’s settings.
You can take a look at the registered service worker on the Application tab of the dev tools of your browser. For example, in Chrome:
Angular’s spin on service workers
When we’ve run the ng add @angular/pwa schematic with the Angular CLI, it generated the ngsw-config.json file in our project root. This file provides a high-level, declarative way to define our caching strategies. When we build our application, the Angular CLI generates the actual service worker based on this file. You can find this generated ngsw-worker.js file in the dist/pwa-tutorial/browser folder.
Now let’s take a look at our ngsw-config.json file in its default state, then I’ll explain the contents:
{
  "$schema": "./node_modules/@angular/service-worker/config/schema.json",
  "index": "/index.html",
  "assetGroups": [
    {
      "name": "app",
      "installMode": "prefetch",
      "resources": {
        "files": [
          "/favicon.ico",
          "/index.csr.html",
          "/index.html",
          "/manifest.webmanifest",
          "/*.css",
          "/*.js"
        ]
      }
    },
    {
      "name": "assets",
      "installMode": "lazy",
      "updateMode": "prefetch",
      "resources": {
        "files": [
          "/**/*.(svg|cur|jpg|jpeg|png|apng|webp|avif|gif|otf|ttf|woff|woff2)"
        ]
      }
    }
  ]
}
First, there is $schema. This just points to a schema file that enables validation and autocompletion in your editor of choice. Second, there is index. This is fairly straightforward, it specifies the entry point of the app.
Here begins the interesting part.
In assetGroups, we can define different groups of our assets and apply our rules to all of the files or URLs listed in the given group. First things first, we have to add a name, which identifies the group.
Then comes install mode, which has two possible values:
prefetchlazy
If we set our group to prefetch, then the service worker will fetch every resource listed in the group when it is caching the current version of the application. This is how we can make our application available in offline mode to our users. Since the app group is set to "installMode": "prefetch" and our important files are all listed in its resources, all of these files will be downloaded and cached and these can be served by the service worker, even if our application is offline. On top of offline functionality, this can also greatly reduce the initial loading time of our application.
Now, our assets group is set to "installMode": "lazy", so it is doing something entirely different. In the resources in this group are our image files. The lazy mode makes sure that we do not load all of these, usually bigger files, unless they are needed. So if we have a big picture shown on one our pages, but those are not necessary for functionality, we can add the important js and html files to our app group, add the images to our assets group and our page will be available without the pictures even if our user is offline and never opened this particular page. However, these pictures still get cached. The lazy mode just means these files get downloaded and cached when they are needed for the first time. So, if the user opens the page when they are online, the image still gets cached and the next time they open the page, it won’t have to be downloaded again, which makes loading the page faster, but also, it will be available even in offline mode.
If installMode is not set, it defaults to prefetch, so if you have lots of big images for example, you should pay extra attention when setting this up.
Notice, that our assets group also has the updateMode property set to prefetch. This property has the same two values available and defaults to whatever the group’s installMode is. In our case, we don’t need to set it in our app group, but we want the assets group to behave differently, so it is set to prefetch.
When it comes to updateMode, prefetch means that if the service worker notices there is a new version of a resource available, it will fetch and cache it immediately. With this setup, our resources in the assets group will only be downloaded and cached for the first time, when the application explicitly needs them, but after that, if there is an updated version of a cached resource, those will be updated immediately.
The lazy value is only valid, if the installMode is set to lazy to begin with. In this mode, the resources are only updated in the cache if they were requested again.
Lastly, the resources object can contain two arrays, files and urls. The file array is self-explanatory. The resources listed in the urls array are not fetched directly from our application directory, but these will be cached according to their HTTP headers, so it is useful when loading scripts or fonts from CDNs for example.
This concludes our default file that the Angular CLI created for us, but before we move on, cacheQueryOptions within assetGroups still worth mentioning. This is an object, that currently only has a single property, ignoreSearch, which is a boolean. This lets you control if the query parameters should be ignored or not.
Keep in mind, that these are evaluated in a top-down way, so you should put the more specific definitions first.
Beyond the defaults
We’ll take a look at the appData and the dataGroups sections, but first, I’ll leave the documentation of this config here. There are options we’re not covering, so make sure to take a look at it to get familiar with what’s available to you. Now, this has been a lot of reading and theory, so let’s get to actually developing something.
The appData section
This section lets you include any data you need to and the SwUpdate service will include it in the update notifications. To see it in practice, this to our ngsw-config.json file, under $schema:
"appData": {
  "version": "1.0.0"
},
Then modify our app.ts. First, add an interface for our AppData type outside of the class definition, then create the newVersion signal and alter our constructor to look like this:
interface AppData {
  version: string;
}
protected readonly newVersion = signal('');
constructor() {
if (this.swUpdate.isEnabled) {
this.swUpdate.versionUpdates
.pipe(filter(event => event.type === 'VERSION_READY'))
.subscribe((event: VersionReadyEvent) => {
this.newVersion.set((event.latestVersion.appData as AppData)?.version ?? ''); // <----- ADD THIS LINE
this.isNewVersionReady.set(true);
});
}
}Now we can add our new signal to the template. Alter the new version notification to look like this:
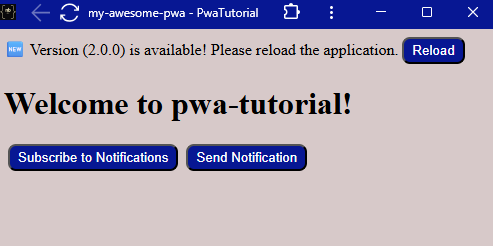
<span>🆕 Version ({{ newVersion() }}) is available! Please reload the application.</span>Now, if you rebuild our application and restart http-server as usual, you’ll see… nothing. That’s because the previous version is cached. When you get notified, that a new version is available, reload the application and alter appData in ngsw-config.json:
"appData": {
  "version": "2.0.0"
},
Now rebuild and restart http-server again. When our new version notification pops up, you should see something like this:
The dataGroups section
This is somewhat similar to assetGroups, but dataGroups let us API requests for example. These are not cached along with the application, so we have to manually configure our caching policies. We’ll take a look at a simple example but there are a lot of options to be aware of, so make sure to explore the documentation I’ve already linked above.
For this example, we will use JSONPlaceholder as our mock backend. Specifically, we will use the /todos endpoint. To start, let’s add our group definition to ngsw-config.json on the same level as assetGroups:
"dataGroups": [
  {
    "name": "todos",
    "urls": [
      "https://jsonplaceholder.typicode.com/todos"
    ],
    "cacheConfig": {
      "maxSize": 1,
      "maxAge": "1d",
      "strategy": "freshness",
      "timeout": "5s"
    }
  }
]
Let me explain this. The name property is basically the same as in the case of assetGroups.
The urls array contains the URL patterns that belong in this group. In our case, we use an exact string, but if we would want to, we could do something like https://jsonplaceholder.typicode.com/** to cache every request sent to JSONPlaceholder. It’s important to note, that only non-mutating requests will be cached. In practice, that means GET and HEAD.
Our cacheConfig setup is very simple. The maxSize parameter sets the maximum number of entries in the cache. Since we are only worried about a single URL, 1 is more than enough. The maxAge parameter configures how long a response can remain in the cache. In this example, it will be cached for 1 day.
Now, strategy is more interesting. It can have 2 values:
freshnessperformance
If it is set to performance and there is a cached resource already, the response will be served from the cache without actually making the network request. This should be only used if the data doesn’t necessarily have to be up to date, so some staleness is acceptable. Think along the lines of avatars for example. Either way, it should be paired with maxAge to make sure that sooner or later our resource gets updated.
In our example, we set it to freshness. This means, that we prefer fetching the data from the network, but if the network times out, we fall back to the cached resource. That brings us to timeout, which controls how long the service worker waits before serving the response from the cache. In this case, this will wait for 5 seconds.
To see this in action, we’ll have to make a few changes. First of all, let’s create a new todos.ts file next to our app.ts with the content being:
import { httpResource } from "@angular/common/http";
import { Component } from "@angular/core";

interface Todo {
  userId: number;
  id: number;
  title: string;
  completed: boolean;
}

@Component({
  selector: 'app-todos',
  template: `
    <h2>Todos</h2>
    <ul>
      @for (todo of todos.value(); track todo.id) {
        <li>{{ todo.title }}</li>
      }
    </ul>
  `,
})
export class Todos {
  protected readonly todos = httpResource<Todo[]>(() => 'https://jsonplaceholder.typicode.com/todos');
}
We just define an interface for our Todo type, add an httpResource that fetches our todos from JSONPlaceholder and render them in our template. Then we should turn to app.ts and add the showTodos signal and the toggleTodos function:
protected readonly showTodos = signal(false);

toggleTodos() {
  this.showTodos.set(!this.showTodos());
}
Alter our template:
@if (showTodos()) {
  <app-todos></app-todos>
}
Since we are using standalone components, make sure Todos is added to the imports array in app.ts:
imports: [RouterOutlet, Todos],With all these changes, if you rebuild our application and reload when you are prompted to, you should see the “Toggle Todos” button, which creates and destroys our brand new Todos component. Let’s open the dev tools, go to the network tab and click our new button. You should see something like this:
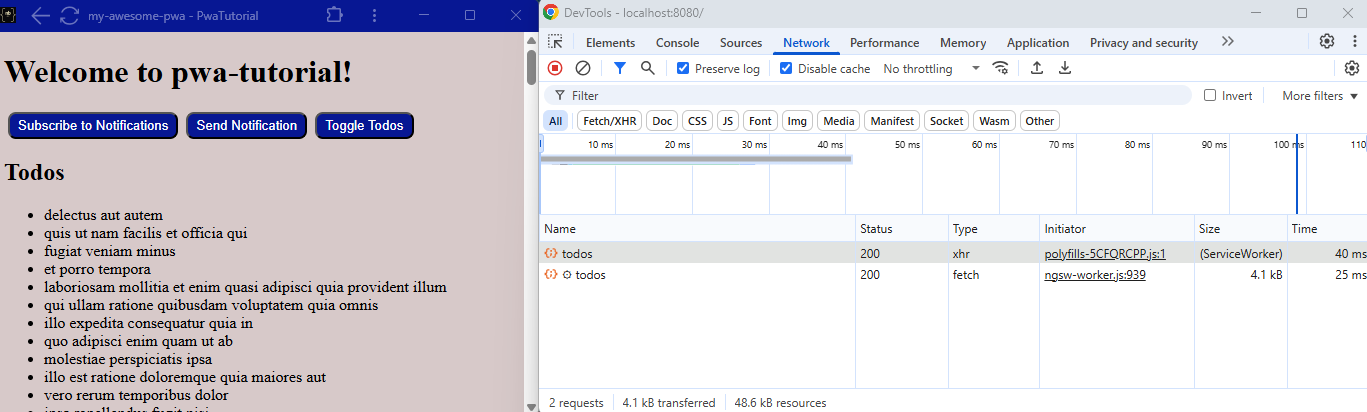
We see that our request was successful. First, we received the data, then our service worker cached it. The initial request took 40 ms to complete. If we click our “Toggle Todos” button twice, another request is sent, which took even longer than the first one. This obviously shows that nothing is being read from the cache, however, the response is cached again.
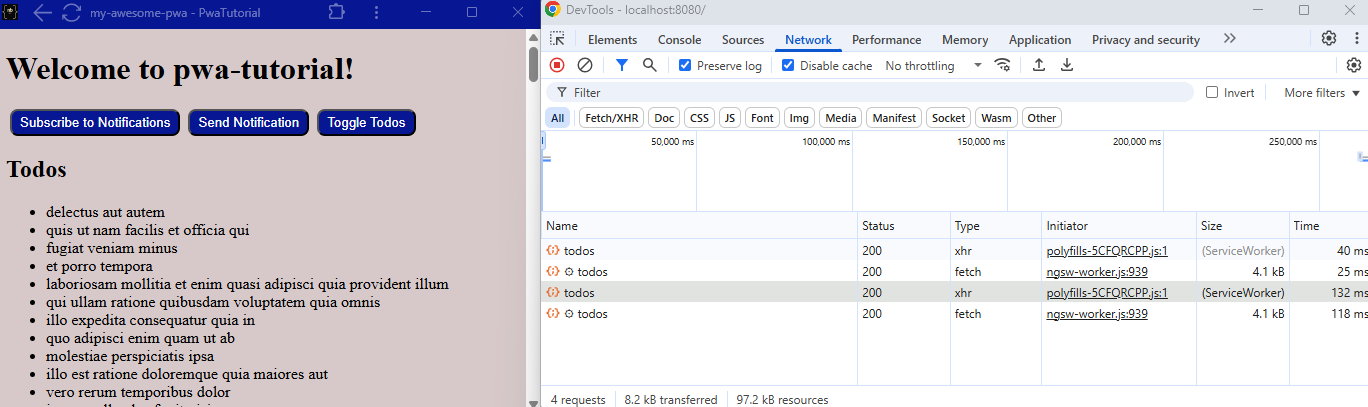
Now set our browser to offline mode in the dev tools and repeat clicking the button twice and we’ll see this:
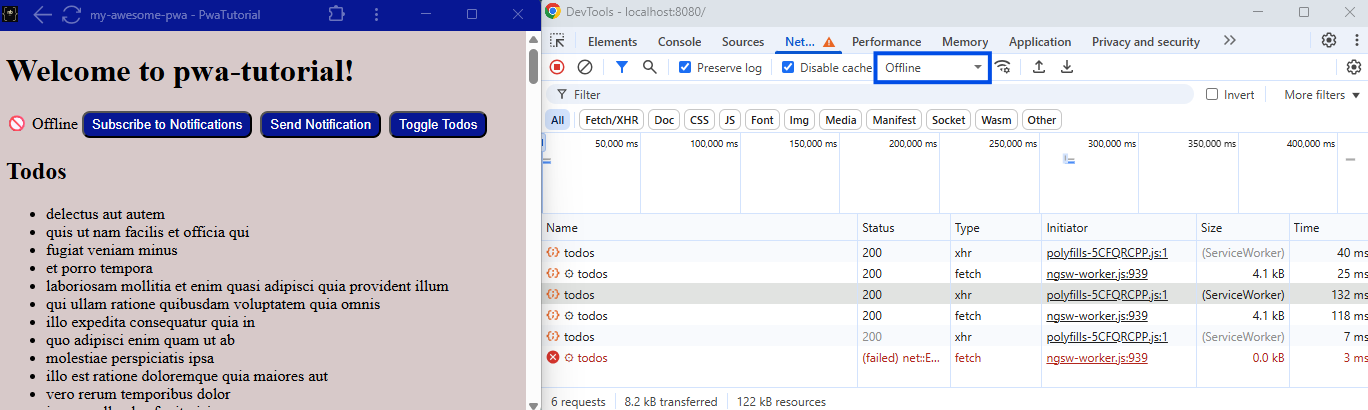
Notice, that it only took 7 ms to get the response and even though we have no network connection, as it also can be seen due to our offline status indicator next to the buttons, we still have the data. Since our browser knows we do not have network connection, the response is served from the cache instantly, even though we have configured it to wait for 5 seconds. However, if we had network connection and this was a real API that wasn’t responding - at least not fast enough - the service worker would’ve waited for 5 seconds before serving from the cache.
If we go back to online mode and toggle Todos, we’re back to actually sending the request and working with real data:
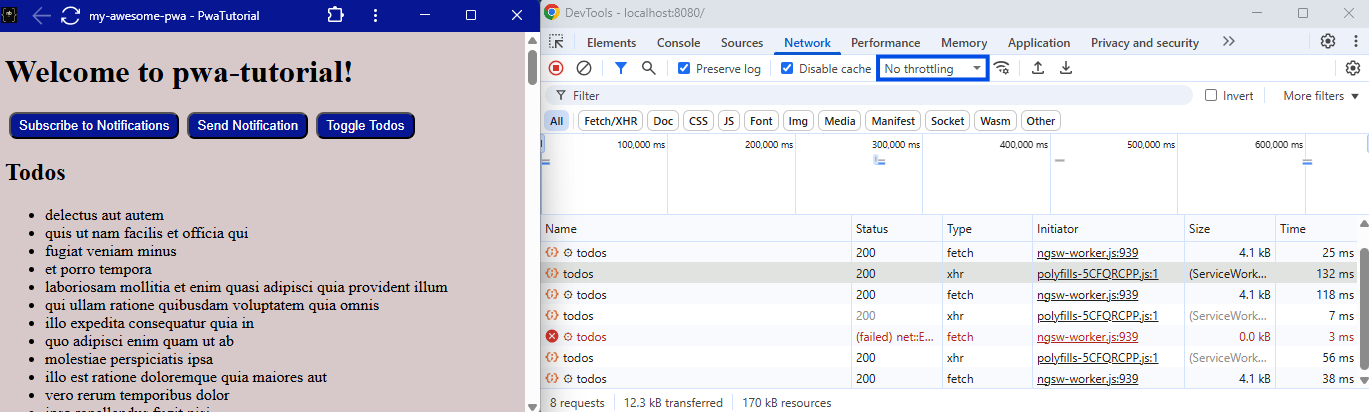
I think for demo purposes this is more than enough, but you can create very complex caching policies if you have a need for them, so make sure to poke around in the dataGroups section of the documentation.