
2025-09-08 @
Angular PWA tutorial part 7 - Deploying our apps to GitHub Pages and Render
Changelog:
2025-09-20: Added link to part 8.
Today, we will talk about deploying our application, but this article builds on the earlier pieces of this series. In case you are new here, make sure to catch up on them:
- Setup
- New version notification
- Node backend for sending push notifications
- Push notification frontend implementation
- Controlling appearance and installability
- Let’s talk caching
As always, the complete source code will be available here.
GitHub
We are not getting deeply into this, as it is way out of scope for this blog series. That said, I do have to mention that everything in this post relies on your code being pushed into a GitHub repository. In case of GitHub pages, a public repository to be exact, unless you have some kind of paid subscription.
GitHub Pages
GitHub Pages is a free service for hosting static websites directly from our GitHub repository. It is not meant to be used for sites with heavy traffic or primarily commercial activity, but for simple blogs, portfolio sites, project docs or demo apps it is perfect. It allows us to easily set up automatic build and deploy when we push changes to a specific branch. By default, your site will get an address like https://<your-github-username>.github.io/<repo-name>, but you can easily add your custom domain if you have one. In fact, this site you’re reading right now is also hosted on GitHub Pages. Since an Angular app becomes a simple static site (unless you use server side rendering) by the end of the build process, GitHub Pages is a great choice for learning and demo purposes.
Render
We will deploy our API to Render. It is a cloud platform with a free tier that offers automatic deployment from Git (not just GitHub but GitLab and Bitbucket too), managed databases, auto-scaling and more. We are only really interested in deploying our API here, but it is definitely worth it to scroll through Render and get familiar with their offers. Technically, we could deploy our frontend to Render too, but I thought using two separate providers makes more sense in a tutorial.
Backend code changes
First of all, we have to change a few things in the basic setup of our API in push-notification-server\index.js.
const port = process.env.PORT || 3000;
const subscriptions = [];

app.use(cors({
  origin: process.env.CORS_ALLOWED_ORIGIN || 'http://localhost:8080'
}));
Right at the beginning, our port definition changed. Render will deploy our application in a container and it will automatically set the PORT environment variable to the right value. We can access it through process.env.PORT. We still keep 3000 as the fallback, since we might want to run our application locally, where we do not have this environment variable set up.
We changed our original subscription variable to subscriptions and made it an array. More on this in just a moment.
The CORS policy also needs to change, since our API will no longer be accessed from our local machine. Again, we keep the original value as the fallback value, but we will create the CORS_ALLOWED_ORIGIN environment variable later, when we are deploying to Render, so the value we add there will be used in our deployed application.
Then, we have to change how we start our server:
app.listen(port, '0.0.0.0', () => {
  console.log(`Server is running at port: ${port}`);
});
Here, we added another parameter to the listen method. The host has to be set to 0.0.0.0 because our app will run in a container. This way, Render will be able to forward traffic to our API in the container.
I said we will talk about the changes regarding subscriptions. I’ll show the code of our altered endpoints utilizing the changes mentioned above, then I’ll explain it. Let’s start with /subscribe:
app.post('/subscribe', (req, res) => {
  const ttl = Date.now() + 5 * 60 * 1000;
  subscriptions.push({ sub: req.body, ttl });
  res.status(201).send();
});
Instead of storing a single subscription, we will push every new subscription to an array, in case several users would try our application. It will be publicly available by the end of this post afterall. That said, there is a send notification button on our page and the endpoint is publicly available too, so we wrap our subscriptions in an object, add a ttl (Time To Live) property to it and set it to the current time plus 5 minutes. We will deal with cleaning up in our /notify endpoint, which will look like this:
app.post('/notify', (req, res) => {
  const now = Date.now();
  for (let i = subscriptions.length - 1; i >= 0; i--) {
    if (subscriptions[i].ttl < now) {
      subscriptions.splice(i, 1);
    }
  }

  const payload = {
    notification: {
      title: 'Test notification'
    }
  };

  Promise.all(subscriptions.map(subscription => webpush.sendNotification(subscription.sub, JSON.stringify(payload))))
    .then(() => res.sendStatus(204))
    .catch(err => {
      console.error('Error while sending push notifications:', err);
      res.sendStatus(500);
    });
});
Every time a request is received, we delete all of the subscriptions that are older than 5 minutes. This is not a very elegant or even remotely good solution, but for demo purposes this will be fine. Since we no longer deal with a single subscription, we will use Promise.all to send a notifications to every subscriber and only send a response to the frontend application, when every notification has been sent. This wraps all of the changes we have to do to our API.
Deploying to Render
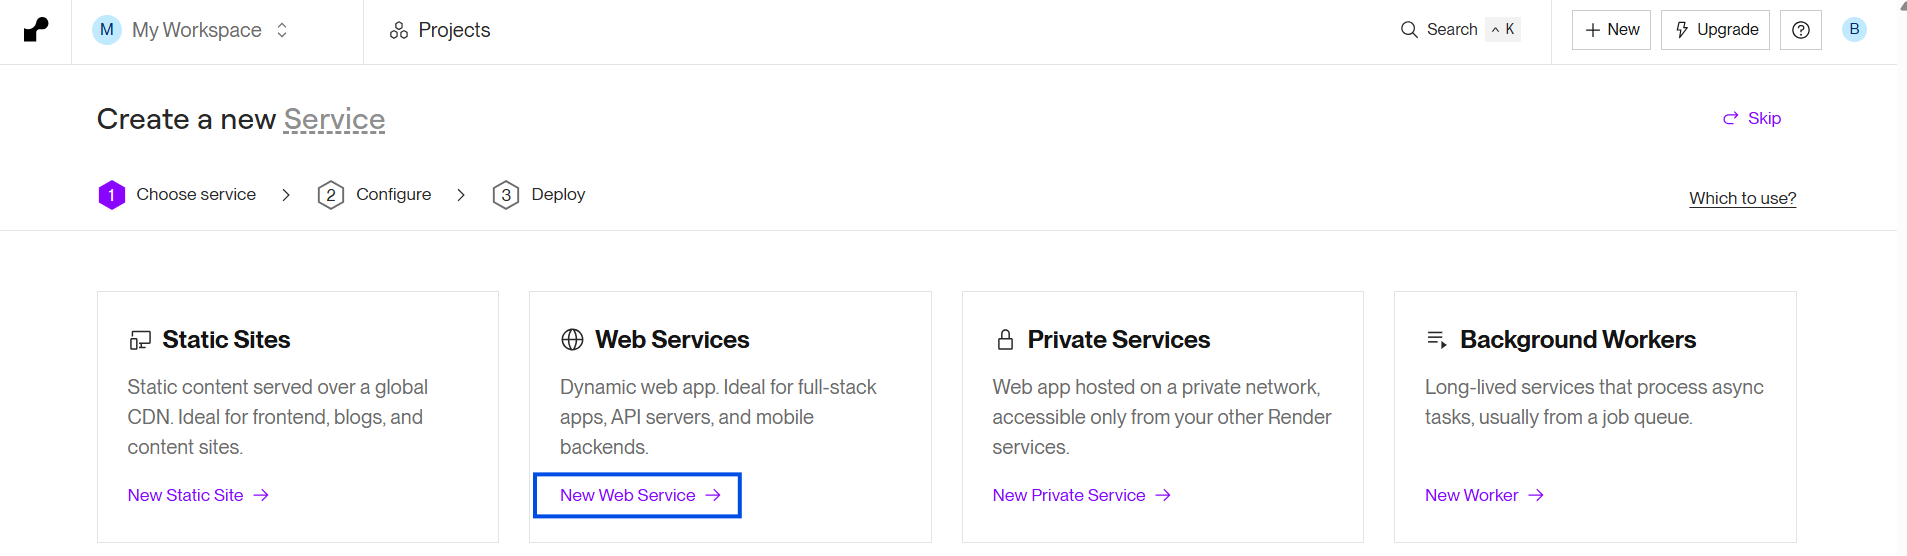
After you signed up to Render, go to the dashboard. You should be prompted to choose a service, but in case you are not, you definitely should see a button that let’s you create or add a new service. You should choose Web Service:
Then, you will have to select the Git provider of your choice, which is GitHub in our case, and connect a repository:

Make sure to click on the connected repository to make the other settings available.
Now we have to configure the used tech, the branch we want to set up for continuous development, and a few more things. Your setup should look something like this:
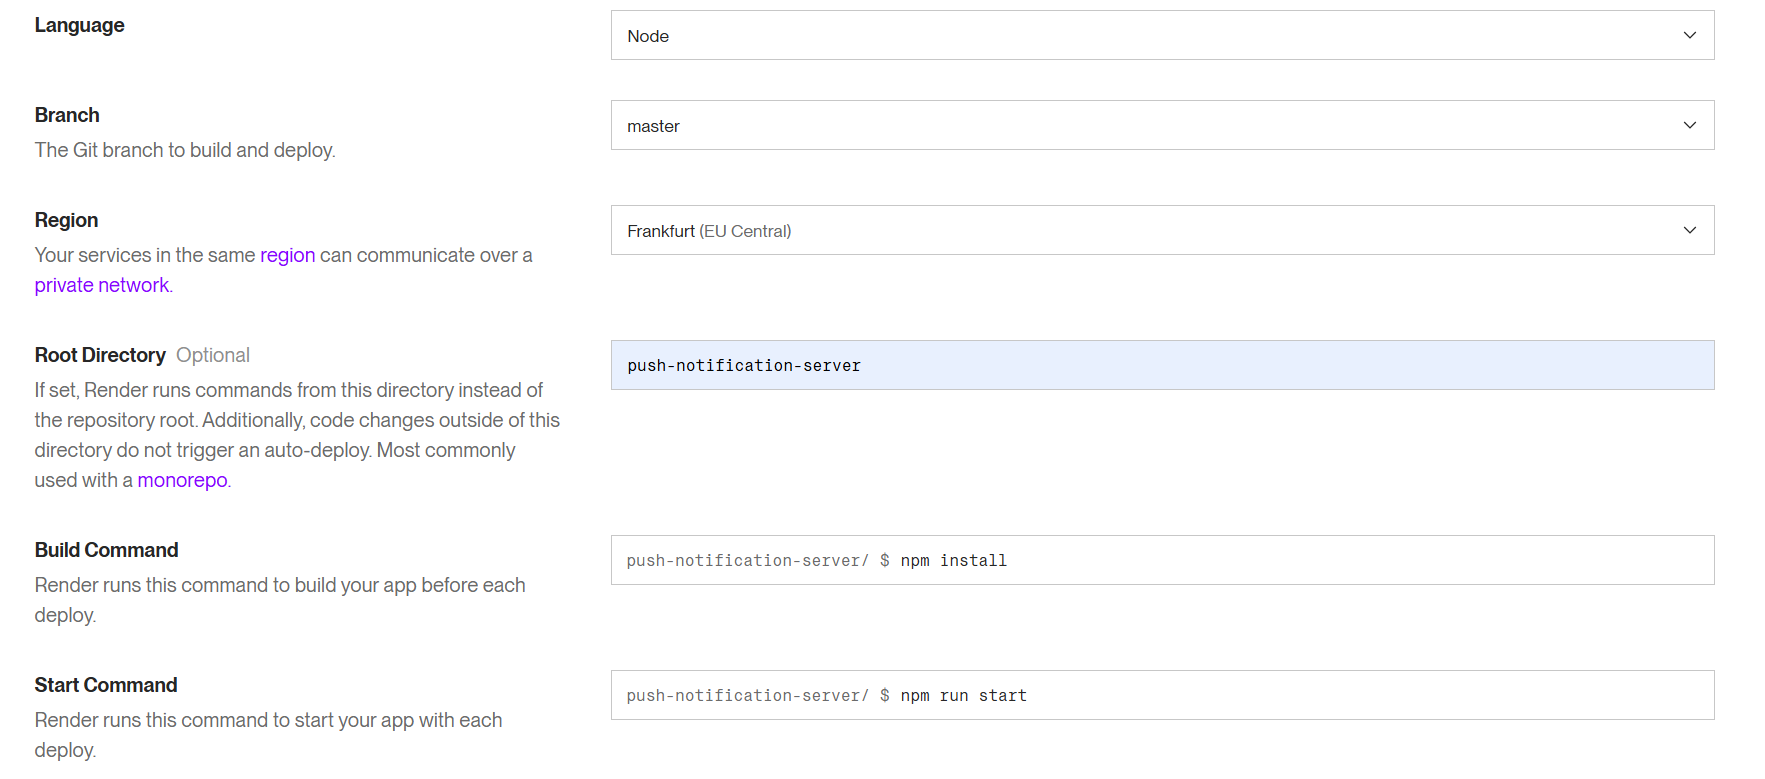
Make sure you select Node as the Language. The Branch can likely stay master, unless you specifically changed it, but make sure to pick the branch you are actually working on. Region doesn’t really matter, pick the one closest to your location. The Root Directory should be set to push-notification-server, given that you kept the project structure I used.
The Build Command will likely contain a build step originally, but we do not have a build process set up, so it should be set to npm install. The Start Command will likely be fine by default.
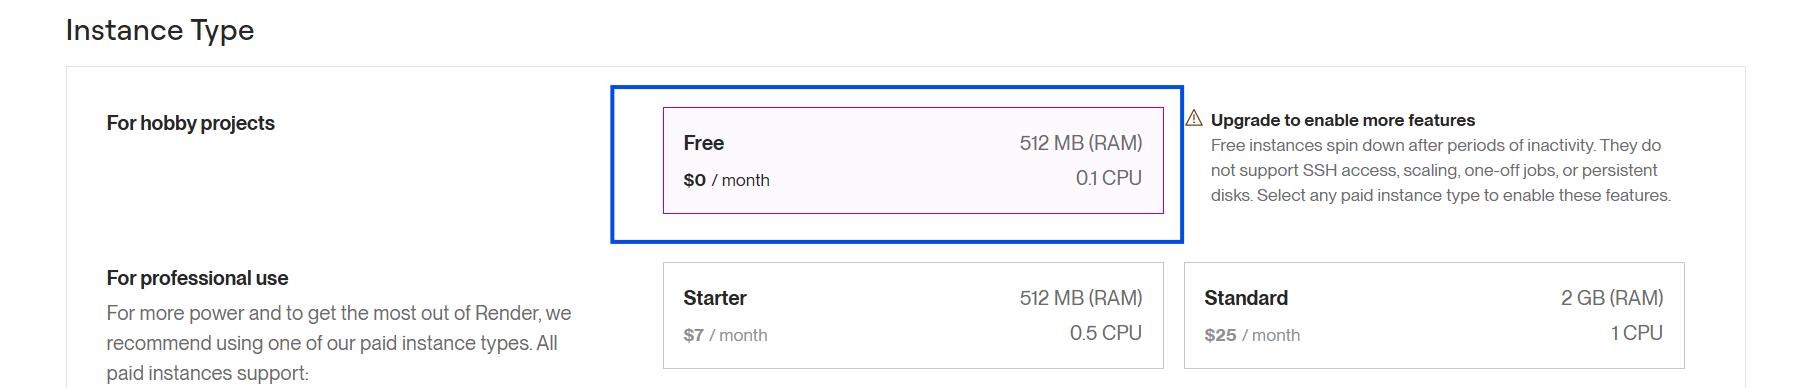
When all of those are set, you will have to pick an instance type. Since this is just a demo, the Free tier will be more than enough.
This is the time, when we have to set up our environment variables. Remember, the PORT variable will be set by Render, but we do have to set CORS_ALLOWED_ORIGIN and also, our VAPID keys we generated in part 2.
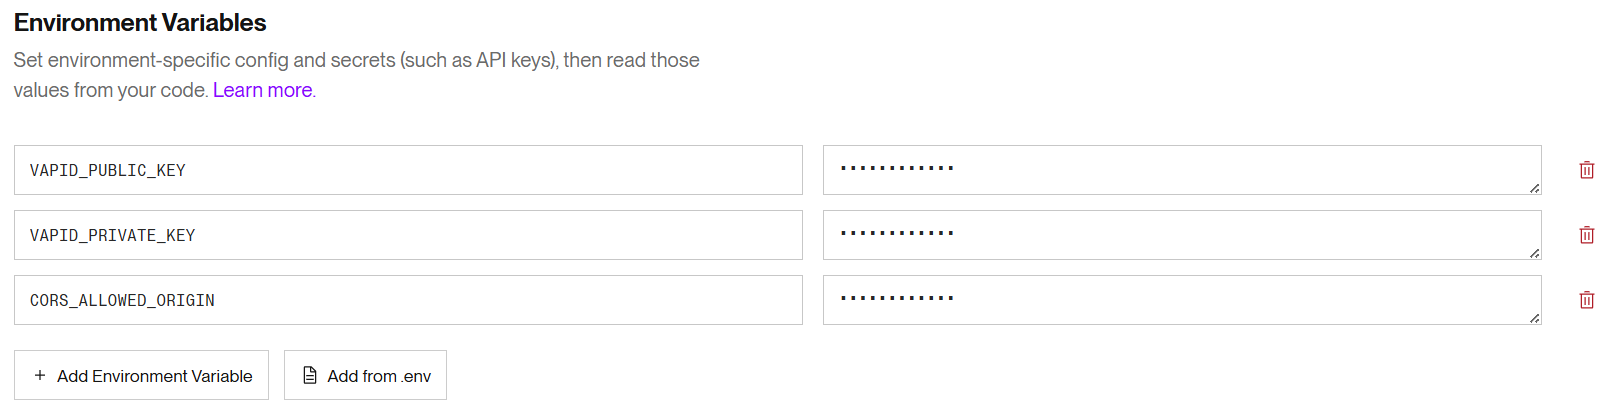
The value of CORS_ALLOWED_ORIGIN should be set to the address the frontend will be hosted at, which will be https://<your-github-username>.github.io in our case. Make sure to not include the repo name when setting this up.
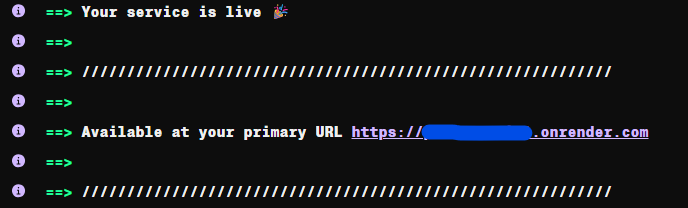
If the environment variables are added, then you just have to click the deploy button at the bottom and wait for the process to end. When it has finished, you will see the URL the API is available at:
Frontend code changes
There are no application logic changes that are strictly necessary, but I did change some styles and added some alerts to make things feel a bit more like something is happening. I also disabled the buttons while the backend requests are pending. This is especially important, because in the free tier, apps hosted on Render will be put to sleep after a bit of inactivity to save on resources, so the first request might take a while, up to a minute or so, to finish. These changes are not important, but I’ll leave the changed parts here:
styles.scss:
button {
  background-color: var(--primary-color);
  color: var(--on-primary-color);
  border-radius: 8px;
  padding: 4px 8px;
  margin: 0 4px;
  cursor: pointer;
}
app.ts
import { Component, inject, signal } from '@angular/core';
import { RouterOutlet } from '@angular/router';
import { NetworkService } from './shared/network/network';
import { SwPush, SwUpdate, VersionReadyEvent } from '@angular/service-worker';
import { filter } from 'rxjs';
import { NotificationService } from './shared/notification/notification';
import { environment } from '../environments/environment';
import { Todos } from "./todos";

interface AppData {
  version: string;
}

@Component({
  selector: 'app-root',
  imports: [RouterOutlet, Todos],
  template: `
    @if (isNewVersionReady()) {
      <span>🆕 Version ({{ newVersion() }}) is available! Please reload the application.</span>
      <button (click)="reload()">Reload</button>
    }
    <h1>Welcome to {{ title() }}!</h1>
    @if (network.isOffline()) {
      <span>🚫 Offline</span>
    }

    <button (click)="subscribe()" [disabled]="isSubscribeDisabled()">Subscribe to Notifications</button>
    <button (click)="notify()" [disabled]="isNotifyDisabled()">Send Notification</button>
    <button (click)="toggleTodos()">Toggle Todos</button>

    @if (showTodos()) {
      <app-todos></app-todos>
    }

    <router-outlet />
  `,
})
export class App {
  protected readonly network = inject(NetworkService);
  private readonly swUpdate = inject(SwUpdate);
  private readonly notification = inject(NotificationService);
  private readonly swPush = inject(SwPush);

  protected readonly title = signal('pwa-tutorial');
  protected readonly isNewVersionReady = signal(false);
  protected readonly newVersion = signal('');
  protected readonly isSubscribeDisabled = signal(false);
  protected readonly isNotifyDisabled = signal(false);

  protected readonly showTodos = signal(false);

  constructor() {
    if (this.swUpdate.isEnabled) {
      this.swUpdate.versionUpdates
        .pipe(filter(event => event.type === 'VERSION_READY'))
        .subscribe((event: VersionReadyEvent) => {
          this.newVersion.set((event.latestVersion.appData as AppData)?.version ?? '');
          this.isNewVersionReady.set(true);
        });
    }
  }

  protected reload() {
    window.location.reload();
  }

  async subscribe() {
    if (this.swPush.isEnabled) {
      this.isSubscribeDisabled.set(true);
      const sub = await this.swPush.requestSubscription({
        serverPublicKey: environment.vapidPublicKey
      });
      this.notification.subscribe(sub).subscribe(
        {
          next: () => {
            alert('Subscribed to notifications');
            this.isSubscribeDisabled.set(false);
          },
          error: err => {
            alert('Could not subscribe to notifications: ' + err);
            this.isSubscribeDisabled.set(false);
          }
        }
      );
    }
  }

  notify() {
    this.notification.notify().subscribe(
      {
        next: () => {
          alert('Notification sent');
          this.isNotifyDisabled.set(false);
        },
        error: err => {
          alert('Could not send notification: ' + err);
          this.isNotifyDisabled.set(false);
        }
      }
    );
  }

  toggleTodos() {
    this.showTodos.set(!this.showTodos());
  }
}
Deploying to GitHub Pages
Deploying to GitHub Pages is pretty simple, thanks to the Angular CLI. The first step we have to do is dependent on your Angular version. In older versions, the outputPath value has been set by default in angular.json, but in case it is not there, make sure your build setup has it:
"build": {
  // ...
  "options": {
    "outputPath": "dist/pwa-tutorial",
    // ...
  },
  // ...
  "defaultConfiguration": "production"
},
I’ve significantly shortened it, but I left in the important parts. Make sure that outputPath is set. Also, I’ve left in defaultConfiguration. We are not changing it, but we will change our production config, so I wanted to note that when we build our application with ng build, the contents of our environment.ts will be used. Since we might want to be able to run our application locally with http-server, I added a new, build-dev script to package.json:
"scripts": {
  "ng": "ng",
  "start": "ng serve",
  "build-dev": "ng build --configuration development",
  "build": "ng build",
  "watch": "ng build --watch --configuration development",
  "test": "ng test",
  "deploy": "ng deploy --base-href=/pwa-tutorial/"
},
You might notice that I also added a deploy script to package.json. This is what we will run in just a second, when we actually deploy our application to GitHub Pages. Make sure to change pwa-tutorial in base-href to your repo’s name, because that’s where your app will be hosted. You also have to change the apiUrl value in environment.ts to the URL the API is available at on Render.
As our last step, we have to install the angular-cli-ghpages package, so run this:
ng add angular-cli-ghpagesThis will install the necessary package, but also update angular.json with:
"deploy": {
  "builder": "angular-cli-ghpages:deploy"
}
This is all the setup we needed. If everything went as expected, you can now run
npm run deployand your app will be up and running in a minute or two at the https://<your-github-username>.github.io/<repo-name> URL. In fact, I just did everything exactly like this and you can access the current version of this app here.
Part 8 of this series, where we create our own install button is out. Go, take a look!
Newsletter
Sign up for my maybe monthly (not likely) newsletter for updates on new posts and other content.