
2025-09-20 @
Angular PWA tutorial part 8 - Adding our own install button
Today, we will create our own install button, but this article builds on the earlier pieces of this series. In case you are new here, make sure to catch up on them:
- Setup
- New version notification
- Node backend for sending push notifications
- Push notification frontend implementation
- Controlling appearance and installability
- Let’s talk caching
- Deploying our apps to GitHub Pages and Render
As always, the complete source code will be available here.
Installing a PWA
We can install PWAs to our home screen, which is great. However, if your users are not developers or tech-savvy people themselves, this may be a pretty big barrier to entry. They might not know about the possibility of installing a PWA to begin with. Even if they do, they might not notice the small icon in the browser’s address bar and installing the app through the share submenu is inconvenient, to say the least. So let’s take a look at implementing our own install button, that prompts our users to install the app.
As a sidenote, there are ways to get your PWA to app stores, like Bubblewrap when it comes to Google Play, but that is out of scope, at least in this specific article.
Prompting our users
We’ll create a service that will handle the prompting. In src/app/shared, create an install folder and add install.ts with the following content:
import { Injectable, signal } from "@angular/core";

@Injectable({
  providedIn: 'root'
})
export class InstallService {
  #deferredPrompt?: any;

  canInstall = signal(false);

  constructor() {
    window.addEventListener('beforeinstallprompt', (e) => {
      e.preventDefault();
      this.#deferredPrompt = e;
      this.canInstall.set(true);
    });
  }

  promptToInstall(): void {
    if (!this.#deferredPrompt) {
      return;
    }

    this.#deferredPrompt.prompt();

    this.#deferredPrompt.userChoice.then(() => {
      this.#deferredPrompt = null;
      this.canInstall.set(false);
    });
  }

  public isSafari() {
    const userAgent = window.navigator.userAgent.toLowerCase();
    return /iphone|ipad|ipod/.test(userAgent) && !/crios|fxios|edgios/.test(userAgent);
  }
}
Let’s explain things. First, let’s talk about the beforeinstallprompt event. This event fires when the browser has detected that the opened website can be installed as a PWA. It should be noted, that this is NOT supported in Safari and Firefox, so in case your users are likely to use those browsers, you need to handle those cases separately. Sadly, in those browsers, you can’t add your own install button, so you would likely have to create some guides about how installing the app works and show that instead.
You can check if the app is running in a certain environment. I’ve added the isSafari helper as an example, but from now on, we’ll base everything on the assumption that we are working with a Chromium based browser, like Chrome, Edge or Opera, because only those are relevant for us here.
Either way, in the constructor of our service, we add a listener to the beforeinstallprompt event. When it fires, we do two things. We set our canInstall signal to true, which will be important when it comes to the UI, and after preventing the default functionality, we store the prompt in our #deferredPrompt variable. We’ll use this variable later, to open a dialog that let’s the user to install the app. It’s the same functionality that happens, when you click the small install button in the address bar in the desktop version of Chrome.
Notice, that #deferredPrompt is of type any. We’ll use any, because BeforeInstallPromptEvent is not baseline due to, as I mentioned, Safari and Firefox not supporting it. You can define your own interface and inherit most of it from Event if you wish, but for now it really doesn’t matter.
This leaves us with the promptToInstall function, which is pretty self-explanatory. We will use this function when our user clicks our install button, and it handles the actual prompting.
Handling the UI
With our service created, let’s start working on app.ts. Before we do anything else, we have to inject InstallService and define some signals:
protected readonly install = inject(InstallService);

readonly #isInstalled = signal(false);
protected readonly showInstallButton = computed(() => !this.#isInstalled() && this.install.canInstall());
Then, we have to check in the constructor, if the app is already installed:
constructor() {
  //...
  // the original code before this remains the same
  afterNextRender(() => {
    const isRunningAsApp = (window.matchMedia('(display-mode: standalone)').matches) || (window.matchMedia('(display-mode: minimal-ui)').matches);
    this.#isInstalled.set(isRunningAsApp);
  });
}
We check if the app is running in standalone or minimal-ui mode, so we can hide our install button if there is no need to show it. The good thing about afterNextRender - compared to ngOnInit - is that it only runs in a browser environment, so accessing window in it does not cause issues. If isRunningAsApp evaluates to true, we set #isInstalled to true, which we use when we determine if the install button should be rendered. The showInstallButton computed signal will be true, if our app is not yet installed (or at least isn’t running in standalone or minimal-ui mode) and the beforeinstallprompt event has fired and we’ve set canInstall in our service to true.
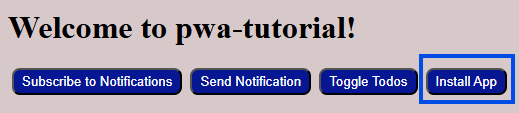
After this, all we have to do is add the install button to our template:
@if (showInstallButton()) {
  <button (click)="install.promptToInstall()">Install App</button>
}
If everything went right, after the next time you run your app, assuming it is not yet installed or you uninstalled it, you should see our install button on the screen:
Newsletter
Sign up for my maybe monthly (not likely) newsletter for updates on new posts and other content.